

git inside Sandbox. Slack receives the final status update.
What you will build
You will:- Upload the Incident Response Skill in the API Portal.
- Create or edit an Incident Responder Profile.
- Add Sandbox, the Skill, and scoped Datadog and Slack managed connectors to the Profile.
- Add the GitHub managed connector so
gitworks inside Sandbox. - Save a new Profile version.
- Export your Perplexity API key and launch the custom agent with
curl. - Receive the agent’s incident update in Slack.
How the pieces fit
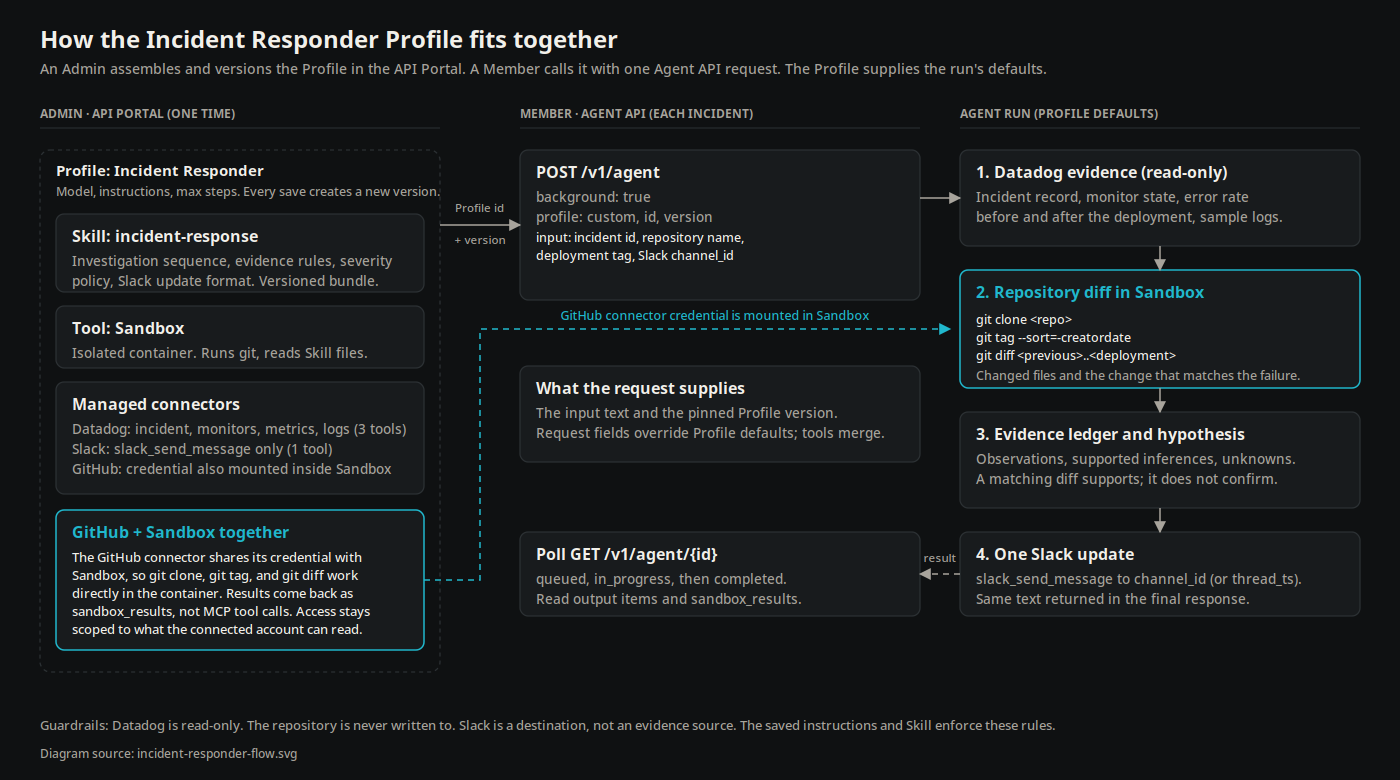
An Admin assembles and versions the Profile once. A Member launches it with one request. The Profile supplies the run's defaults.
- Profile: Saves the model, instructions, Sandbox, Skill, managed connectors, and agent loop settings under one reusable ID. Every save creates a new version, and a request pins one version. See the Profiles guide.
- Skill: Gives the agent an incident investigation procedure, evidence rules, and a status update format. See the Skills guide.
- Sandbox: Runs commands in an isolated container. The agent uses it to read the Skill’s supporting files and to run
git. See the Sandbox guide. - Datadog managed connector: Gives the agent access to incident details, monitors, and logs. It is the telemetry source.
- GitHub managed connector: Supplies the GitHub credential to Sandbox so the agent can clone the service repository and diff the deployment against the previous release.
- Slack managed connector: Lets the agent send the completed status update. It is the delivery destination, not an investigation source.
tools merge per tool instead of replacing the whole set, and a connector passed in the request replaces a Profile connector with the same ID. Pin production traffic to a specific Profile version and keep the request to profile, input, and background so the run uses exactly what the Admin saved. See Override profile settings.
Why GitHub and Sandbox together matter
Most connectors expose a fixed list of tools that the agent calls one at a time, and each call appears in the response as anmcp_call item. The GitHub connector can do more. When the Profile includes both GitHub and Sandbox, the connector makes its credential available inside the container, so the agent runs the git and gh CLIs directly against repositories the connected account can access. See Use connectors in the sandbox.
For incident response, this changes what the agent can do:
- It clones the repository, lists release tags with
git tag --sort=-creatordate, and runsgit diff <previous>..<deployment>in a few commands instead of paging through file-by-file API calls. - It reads the exact lines that changed in the deployment named in the incident and compares them with the failure signature in Datadog.
- Access follows the connected GitHub account. Private repositories work without adding a token to your application code, and the agent cannot reach anything the account cannot.
- In the response, this work appears as
sandbox_resultsitems that contain the commands and their output, so you can audit every command the agent ran.
Prerequisites
You need:- A Perplexity API key for the Project that contains the Profile, Skill, and managed connectors.
- Access to the API Portal.
- A Project admin to create or manage the Profile, Skill, and Datadog, GitHub, and Slack managed connectors.
- Permission to use those saved resources in the selected Project.
- Bash,
curl, andjqon the machine that launches the request. - A Datadog incident ID that the connected account can access.
- A GitHub repository that the connected account can read, with a release tag for the deployment named in the incident and at least one earlier tag to diff against. The example uses
owner/service-repowith tags2026.09.01.3and2026.09.02.1; replace them with your own. - A Slack channel that the connected account can post to.
https://YOUR_WORKSPACE.slack.com/archives/C012ABC, the channel ID is C012ABC. Make sure the connected Slack account can post to the channel. For a private channel, invite the connected account before running the agent.
The run is billable. Cost and duration depend on the Profile’s model and step limit and on the managed connector calls the agent makes.
Configure the API Portal
Upload the Skill
The Skill has one top-level folder, oneSKILL.md, and two supporting files. Download the bundle and upload it directly, or inspect and recreate the files below.
Download the Incident Response Skill
incident-response.zip: the complete bundle shown below, ready to upload in the API Portal.Create or edit the Profile
Open Customization, select Profiles, and create or edit a Profile namedIncident Responder. Choose a tool-capable Agent API model available to your Project, use the instructions below, leave reasoning effort at Default, and set max steps to 30.
Paste these instructions into the Profile:
- Under Tools, add Sandbox.
- Under Skills, attach the
incident-responseSkill. - Under Connectors, add the Datadog, Slack, and GitHub managed connectors. Connect each one if your Project has not saved its credentials yet. A connector that shows Connect instead of Connected has no usable credential, and the agent will find no tools for it at run time.
- Restrict Datadog to
get_datadog_incident,search_datadog_logs, andsearch_datadog_monitors. - Restrict Slack to
slack_send_message. - Leave the GitHub allowed tools at the default. With Sandbox enabled and no allowlist, GitHub runs through the
gitandghCLIs in the container and the response recordssandbox_resultsinstead ofmcp_callitems. Setting an allowlist switches GitHub back to one-tool-at-a-time connector calls. - Save the Profile to create a new version. Copy the Profile ID and version for the API request.
preset to a request that uses a Profile. The request uses the configuration saved in the selected Profile version.
Inspect the Skill source
The bundle contains no credentials. Its source is included below so you can review the instructions and supporting files before uploading it.SKILL.md
SKILL.md
references/investigation-checklist.md
references/investigation-checklist.md
references/severity-and-comms.md
references/severity-and-comms.md
Add your API key
Export your Perplexity API key:Launch the incident responder
Replace these placeholders in the command:profile_YOUR_PROFILE_ID: the Profile ID from the API Portal.YOUR_PROFILE_VERSION: the saved Profile version. Keep it a string.YOUR_DATADOG_INCIDENT_ID: an incident the Datadog connector can access.owner/service-repo: the GitHub repository the connected account can read.2026.09.02.1: the release tag of the deployment named in the incident.YOUR_SLACK_CHANNEL_ID: the channel ID you copied from Slack.
PERPLEXITY_API_KEY remains the only environment variable.
Optional: Reply in a Slack thread
Keep the channel-only input above for the default flow. To reply in an existing thread, also give the agent the parent message timestamp asthread_ts. The managed Slack connector’s slack_send_message tool requires channel_id and message, and accepts thread_ts for a reply. The agent writes message; your run input supplies the destination.
Slack message links contain both destination values. For /archives/C012ABC/p1234567890123456, use channel_id C012ABC and thread_ts 1234567890.123456. To convert the message segment, remove the leading p and insert a decimal point before the final six digits.
Replace the final update line in RUN_INPUT with:
channel_id is still required when you provide thread_ts.
The request contains no model, Skill, connector, tool, or third-party credential configuration:
profileselects the saved custom agent configuration. Its version must be a string, such as"5".inputsupplies only the incident, repository, deployment tag, and Slack destination for this run.backgroundreturns a response ID immediately so your system can retrieve the run without holding the original connection open.
queued or in_progress and stops at a terminal status. The completed Agent API response includes the Skill load, Sandbox file reads, Datadog mcp_call items, sandbox_results items with the git clone, git tag, and git diff commands and their output, and the final incident brief. A completed response does not guarantee that every managed connector call succeeded. Before treating the run as successful, confirm that it contains one slack_send_message call with no mcp_call.error, and that the sandbox_results show the diff between the two release tags.
In the final brief, look for the repository evidence in the ledger: the two tags, the files changed between them, and the specific change the agent matched to the failure signature. The Skill requires the agent to label that match a supported inference, not a confirmed root cause.